Klarna Payments
Zuletzt bearbeitet am: 08.03.2024
Requirements
Klarna merchant account
Before you can set up and use Klarna in Shopware, you need to open a merchant account with Klarna. A separate account in Klarna Playground is required to perform test orders. Our merchant support will be happy to assist you in activating payment methods and countries.
Technical requirements
In order to install the Klarna plugin, you need a running environment of Shopware 5. For installation instructions, see Getting Started with Shopware 5.
- Shopware (Version >= 5.6)
- PHP (version >= 7.2 and <= 8.1)
Klarna's systems must be able to access your store to send payment updates. Pay special attention to this if you have a password request (htpasswd) in front of your site.
To avoid rounding errors, the PHP extension bcmath should be installed and activated on the server.
Installation and configuration
Installation via plugin manager
Install and activate the plugin via the plugin manager in the Shopware 5 backend.
Plugin configuration
After the successfully completed installation and activation of the plugin, you can edit the settings of the plugin via Settings -> Plugin Manager -> Installed -> Klarna Payments -> Open.
The following configurations are available there
| Name | Description |
|---|---|
| Test or Live Mode | In test mode only test orders are created, no payments take place. Make sure to use live mode and use your live credentials as soon as you want to use Klarna productively in your store and real orders are placed. |
| Live Merchant ID | The Klarna API Key provided by Klarna. You can retrieve it at https://eu.portal.klarna.com/. |
| Live Merchant Password | The Klarna API password provided by Klarna. You can retrieve it at https://eu.portal.klarna.com/. |
| Test Merchant ID | The Klarna API Key provided by Klarna. You can retrieve it at Klarna Playground. |
| Test Merchant Password | The Klarna API password provided by Klarna. You can retrieve it at Klarna Playground. |
| Plugin responds to order status | Should the automatic Klarna actions "Full capture at (order status)" and "Full refund at (order status)" be enabled? Details about the configuration can be found here. |
| Plugin reacts to Pickware order updates | Should the automatic actions "Partially capture at (order item status)" and "Partially refund at (order item status)" be activated for Pickware order updates? |
| Trigger refund when shipped quantity is reduced in Pickware | If enabled, trigger refund when shipped quantity is reduced in Pickware |
| Capture Full at (Order Status) | Select the order status where the full remaining amount of an order should be captured in Klarna. |
| Refund Full at (Order Status) | Select the order status where the entire amount already captured should be refunded to the customer by Klarna. Amounts of the orders that have not yet been captured will be released and can no longer be captured. |
| Partial capture at (status order item) | Select the status of the order item at which amount of the item should be captured at Klarna. |
| Partial refund at (Order item status) | Select the status of the order item where the amount of the item should be refunded by Klarna to the customer. |
| Buy Button Color | Only for Klarna Checkout: Color of the buttons within the Klarna iFrames |
| Buy Button Text Color | Only for Klarna Checkout: Text color of the buttons within the Klarna iFrames |
| Checkbox Color | Only for Klarna Checkout: Color of the checkbox within the Klarna iFrames |
| Checkbox Hook Color | Only for Klarna Checkout: Color of the checkbox hooks within the Klarna iFrames |
| Header Color | Only for Klarna Checkout: color for the header within the Klarna iFrames |
| Link Color | Only for Klarna Checkout: color for the links within the Klarna iFrames |
| Frame Color | Only for Klarna Payments: color for the frame within the Klarna iFrames |
| Selected Frame Color | Only for Klarna Payments: color for the selected frame within the Klarna iFrame |
| Details Color | Only for Klarna Payments: Color for the text within the Klarna iFrame |
| Secondary Text Color | Deprecated, option has no effect anymore |
| Details Color | Only for Klarna Payments: Color for the list items within the Klarna iFrame |
| Frame Radius | The frame radius in pixels |
| Log level | Select how detailed Klarna should log events. Production: Only errors are logged; Debug: All information from and to Klarna is logged |
| Log expiration time | Select how many days log files should be stored before they are automatically deleted |
| Shipment Number Separator | Specify a separator to allow multiple shipment numbers for one order to be transferred to Klarna |
| Enable On-Site Messaging? | Select whether you want to enable Klarna's on-site messaging |
| Test or Live Mode for Klarna On-Site Messaging | Do you want to use Test or Live Mode for On-Site Messaging? This setting is independent of the setting above for Payment Process |
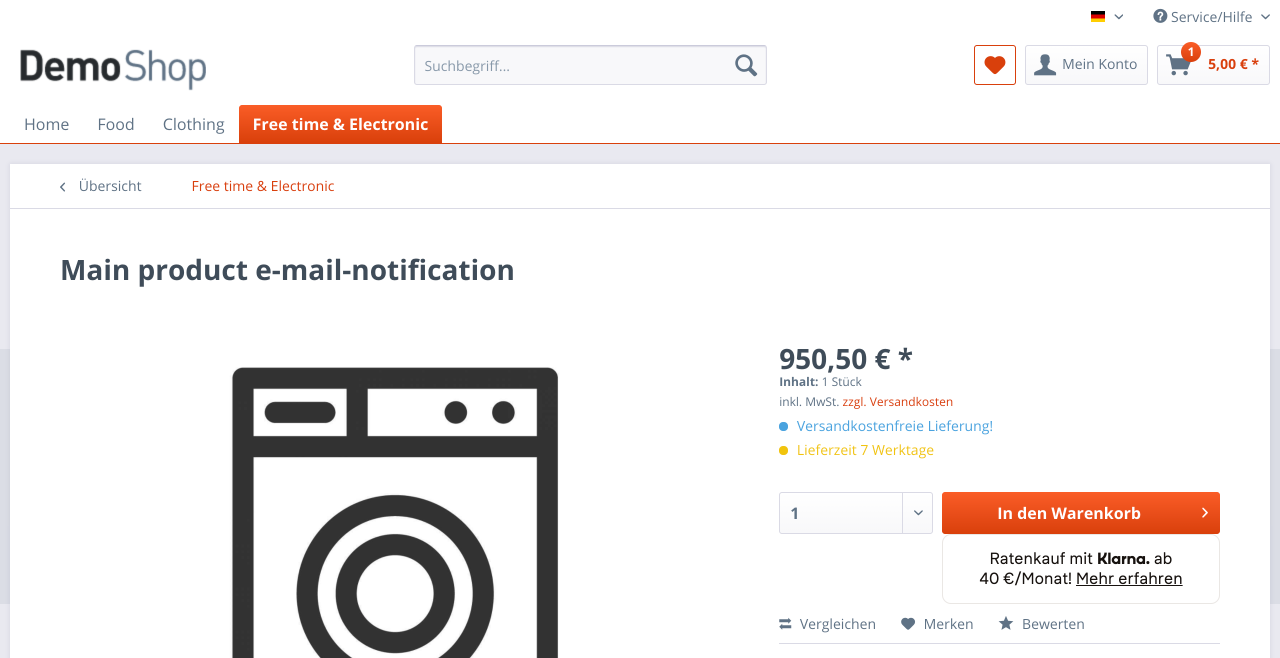
| Enable On-Site Messaging on the product detail page? | Select whether to display on-site messaging on the product detail page |
| Enable On-Site Messaging in Off-Canvas Shopping Cart? | Select whether to display on-site messaging in the off-canvas shopping cart |
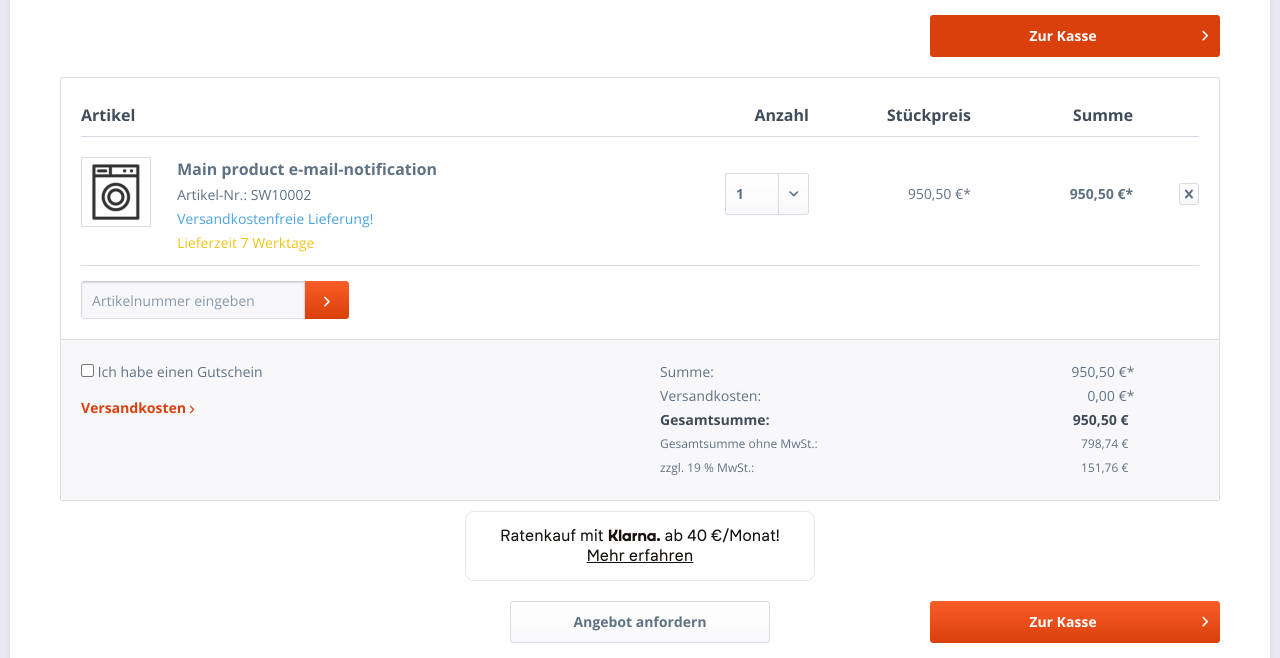
| Enable On-Site Messaging in Shopping Cart? | Select whether to display on-site messaging in the shopping cart |
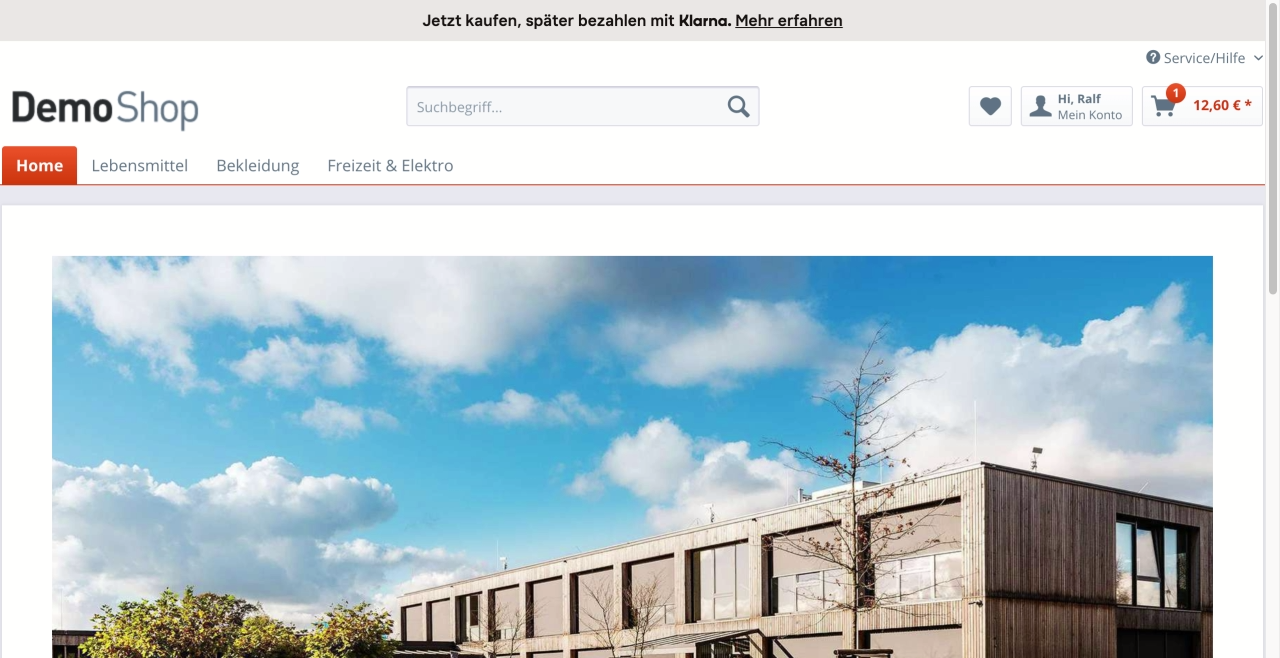
| Enable On-Site Messaging Top strip promotion on home page? | Select whether to display on-site messaging on the home page header |
| Enable On-Site Messaging in Footer Area | Choose if you want the On-Site Messaging to be displayed in the footer |
| On-Site Messaging Live Client ID | This field cannot be edited and is automatically populated by the plugin once on-site messaging is enabled |
| On-Site Messaging Test Client ID | This field cannot be edited and will be filled automatically by the plugin once on-site messaging has been activated |
| Activate Klarna Express | Activate the Klarna Express Button in the checkout |
| Default Salutation for Klarna Express | Select the salutation that is used for registrations via Klarna Express |
| Button Theme | Select how you want the Klarna Express button to be displayed. See display options |
| Button Label | Select how you want the Klarna Express button to be displayed. See display options |
| Button CSS Class | Specify an individual CSS class from your Shopware theme to adjust the size of the button, for example. |
| Button Shape | Select how you want the Klarna Express button to be displayed. See display options |
Enable payment methods
The Klarna Payments plugin includes the payment categories Pay now, Pay later and Slice it. Within Pay now the individual payment methods Direct Bank Transfer (Sofortüberweisung), Direct Debit (Lastschrift) and Klarna Credit Card (Kreditkarte) are also available.
Please activate the payment methods you want to use under 'Settings -> Payment methods'.
The following fields must not be customized:
- Description
- Name
- Template
- System class
- Database table
It is not allowed to add a surcharge to Klarna payment methods. If this is attempted, it will be blocked with appropriate error message.
Your Klarna merchant account is unlocked for either combined or single payment methods. Please contact Klarna merchant support if you wish to customize the available payment methods.
Assign payment methods to shipping costs
Before Klarna payment types can be used, they must be enabled for shipping methods. Navigate to 'Settings -> Shipping costs', select a shipping method for which the Klarna payment methods should be available and select the tab 'Payment method selection'.
Move the Klarna payment methods from Available to Selected.
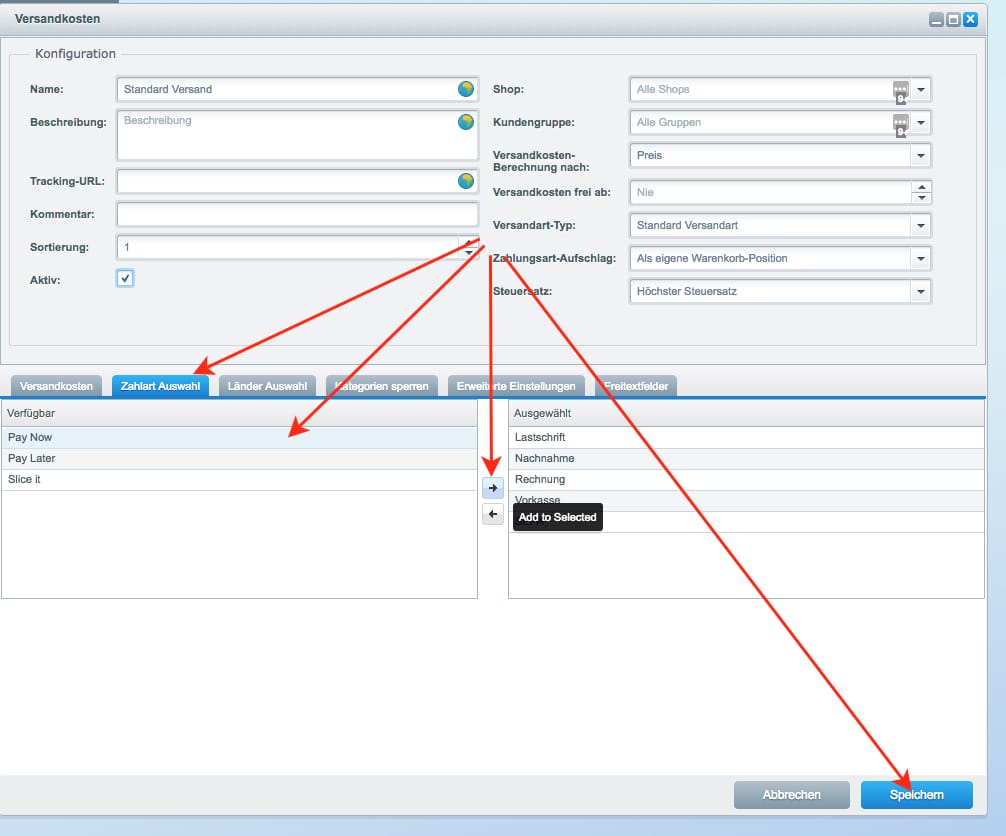
Repeat the process for all shipping methods where you want Klarna payment methods to be available.
Uninstall plugin
The plugin can be uninstalled via the Plugin Manager in the Shopware 5 backend.
When uninstalling the plugin, the payment types will be deactivated, but none orders or payment types will be deleted.
Also, do not delete the payment types manually, otherwise there may be problems with orders that were paid with Klarna.
Klarna Instant Shopping
The Klarna Instant Shopping product was discontinued in April 2021 and is no longer available since plugin version 1.5.0.
Klarna Express Button
With the Klarna Express Button you enable your customers to use their existing Klarna account to login to your store. The button is displayed in the shopping cart or checkout process of the store during a guest session.
Requirements for Klarna Express
Your merchant account must be activated for Klarna Express to display and use the button. Please contact merchant support for this.
Display options for Klarna Express
Via the plugin configurations you have different options to display the button in your store in an optimal way. Please note that all options are predefined by Klarna and no individual options can be added. For individual adjustments to the button, use the CSS class, which can also be stored in the configuration.
Button Theme
| Default | Dark | Light |
|---|---|---|
 |
 |
 |
Button Label
| Default | Klarna |
|---|---|
|
 |
Button Shape
| Default | Rectangle | Pill |
|---|---|---|
 |
 |
 |
Klarna On-Site Messaging
Activate On-Site Messaging
If you are not yet activated for Klarna On-Site Messaging, set the option 'Activate On-Site Messaging' to "Yes" and save the plugin configuration of the Klarna Payments plugin again. You will now be guided through the activation process. You must accept the Terms of Usage (ToU) in order to use it.
Display options
Product detail page
Off-canvas shopping cart

Shopping cart
Top strip promotion
Footer
In shopping worlds
Use the "Klarna Banner" element for this and configure it according to your wishes in a shopping world.
Individual positioning
It is possible to integrate on-site messaging placements in your theme as you wish. For this, use the templates in the path frontend/bestit_klarna_onsite_messaging/placements from the Klarna plugin.
credit-promotion.tpl
|
|
|
|---|
| Name | Values | Description |
|---|---|---|
| purchaseAmount | value in cents (e.g. 1903) | (required) The purchase value of the item(s) in cents. 1903 stands for 19,03€ |
| refreshOnLoad | false / true | (optional) true: The placement will be re-initialized. This is necessary if the placement tag is added to the page content after the "pageload" event, as is the case with Ajax-loaded content. |
| shouldUpdate | false / true | (optional) true: The placement is reinitialized as soon as the price (purchaseAmount) changes. For example when the number of items to be purchased changes. |
sidebar-promotion.tpl
homepage-promotion.tpl
| Name | Values | Description |
|---|---|---|
| bannerType | box / tall / wide | (optional) The different types of banners Klarna provides. |
| refreshOnLoad | false / true | (optional) true: The placement will be reinitialized. This is necessary if the placement tag is added to the page content after the "pageload" event as it is the case with ajax loaded content or shopping world content. |
top-strip-promotion.tpl
Operation and usage
Customize invoice template
If you also create invoices via Shopware you can customize your invoice template within the PDF document creation to add more information about payment via Klarna.
Klarna automatic actions
See the documentation within the Order Management for this.
Information for developers
Extra Merchant Data
The "Extra Merchant Data" events allow you to submit additional information and data to Klarna.
Session creation
To add more data when creating the Klarna session, you can use the BestitKlarnaPayments\Components\Constants::EVENT_CREATE_SESSION_ATTACHMENT event. Its implementation must return an object of class BestitKlarnaOrderManagement\Components\Api\Model\Attachment. See the following example:
<?php

namespace App\Subscriber;

use BestitKlarnaOrderManagement\Components\Api\Model\Attachment;
use BestitKlarnaPayments\Components\Constants;
use Enlight\Event\SubscriberInterface;

class SomeSubscriber implements SubscriberInterface
{
    public static function getSubscribedEvents()
    {
        return [
            Constants::EVENT_CREATE_SESSION_ATTACHMENT => 'createSessionAddEmdData',
        ];
    }

    public function createSessionAddEmdData()
    {
        $attachment = new Attachment();

        $attachment->contentType = 'application/vnd.klarna.internal.emd-v2+json';
        $attachment->body = json_encode([
            'marketplace_seller_info' => [[
                'product_category' => 'Women\'s Fashion',
                'product_name' => 'Women Sweatshirt',
            ]],
        ]);

        return $attachment;
    }
}
Authorization of a payment
The event BestitKlarnaPayments\Components\Constants::EVENT_AUTHORIZE_ORDER_ATTACHMENT can be used to add additional data when authorizing a payment. Its implementation must return an object of class BestitKlarnaOrderManagement\Components\Api\Model\Attachment. See the following example:
<?php

namespace App\Subscriber;

use BestitKlarnaOrderManagement\Components\Api\Model\Attachment;
use BestitKlarnaPayments\Components\Constants;
use Enlight\Event\SubscriberInterface;

class SomeSubscriber implements SubscriberInterface
{
    public static function getSubscribedEvents()
    {
        return [
            Constants::EVENT_AUTHORIZE_ORDER_ATTACHMENT => 'authorizeOrderAddEmdData',
        ];
    }

    public function authorizeOrderAddEmdData()
    {
        $attachment = new Attachment();

        $attachment->contentType = 'application/vnd.klarna.internal.emd-v2+json';
        $attachment->body = json_encode([
            'marketplace_seller_info' => [[
                'product_category' => 'Women\'s Fashion',
                'product_name' => 'Women Sweatshirt',
            ]],
        ]);

        return $attachment;
    }
}
Order completion
The event BestitKlarnaPayments\Components\Constants::EVENT_PLACE_ORDER_ATTACHMENT can be used to add additional data during order completion. Its implementation must return an object of class BestitKlarnaOrderManagement\Components\Api\Model\Attachment. See the following example:
<?php

namespace App\Subscriber;

use BestitKlarnaOrderManagement\Components\Api\Model\Attachment;
use BestitKlarnaPayments\Components\Constants;
use Enlight\Event\SubscriberInterface;

class SomeSubscriber implements SubscriberInterface
{
    public static function getSubscribedEvents()
    {
        return [
            Constants::EVENT_PLACE_ORDER_ATTACHMENT => 'placeOrderAddEmdData',
        ];
    }

    public function placeOrderAddEmdData()
    {
        $attachment = new Attachment();

        $attachment->contentType = 'application/vnd.klarna.internal.emd-v2+json';
        $attachment->body = json_encode([
            'marketplace_seller_info' => [[
                'product_category' => 'Women\'s Fashion',
                'product_name' => 'Women Sweatshirt',
            ]],
        ]);

        return $attachment;
    }
}
Theme customizations
All the following customizations and extensions are examples and templates. You can add the corresponding elements at any place.
Klarna logo
To add the Klarna logo in the footer, extend the frontend/index/footer-navigation.tpl template in your theme.
{extends file='parent:frontend/index/footer-navigation.tpl'}
{block name='frontend_index_navigation_klarna_Logo'}
    <div class="footer--column column--menu block">

    {block name="frontend_index_footer_column_information_menu_headline"}
        <div class="column--headline">{s name='FooterPayWithKlarna'}Zahlen Sie mit{/s}</div>
    {/block}

    {block name="frontend_index_footer_column_information_menu_content"}
        <img src="https://cdn.klarna.com/1.0/shared/image/generic/logo/de_de/basic/logo_black.png?width=100"
             alt="{s name='FooterPaymentAlt'}Zahlungsart{/s}"/>
    {/block}
    </div>
{/block}
To add the Klarna logo on the item detail page, expand the frontend/detail/content/buy_container.tpl template in your theme.
    {extends file='parent:frontend/detail/content/buy_container.tpl'}
    {block name='frontend_detail_klarna_Logo'}
                <div class="column--headline">{s name='FooterPayWithKlarna'}Zahlen Sie mit{/s}</div>
                <img src="https://cdn.klarna.com/1.0/shared/image/generic/logo/de_de/basic/logo_black.png?width=100"
                     alt="{s name='FooterPaymentAlt'}Zahlungsart{/s}"/>
    {/block}
To add the Klarna logo in the header area, expand the frontend/index/logo-container.tpl template in your theme.
    {extends file='parent:frontend/index/logo-container.tpl'}
    {block name='frontend_index_logo'}
        {$smarty.block.parent}
        <div class="logo--Klarna block">
                <picture>
                    <source srcset="https://cdn.klarna.com/1.0/shared/image/generic/logo/de_de/basic/logo_black.png?width=100" media="(min-width: 78.75em)">
                    <source srcset="https://cdn.klarna.com/1.0/shared/image/generic/logo/de_de/basic/logo_black.png?width=100" media="(min-width: 64em)">
                    <source srcset="https://cdn.klarna.com/1.0/shared/image/generic/logo/de_de/basic/logo_black.png?width=100" media="(min-width: 48em)">

                    <img srcset="https://cdn.klarna.com/1.0/shared/image/generic/logo/de_de/basic/logo_black.png?width=100" alt="{s name='FooterPaymentAlt'}Zahlungsart{/s}" />
                </picture>
        </div>
    {/block}
Klarna banner
To add the Klarna banner in the header, expand the frontend/index/shop-navigation.tpl template in your theme.
    {extends file='parent:frontend/index/shop-navigation.tpl'}
    {block name="frontend_index_top_bar_Klarna"}
        // Hier können Sie Ihren eignen gewünschten Banner ersetzen ..
        <script src="https://cdn.bannerflow.com/bf-placements/5a70b4697010901ca00890ab?targeturl=https%3A//www.klarna.com&politeloading=off&merchantid=501901433" async></script>
    {/block}
To add the Klarna banner in the main page, expand the frontend/home/index.tpl template in your theme.
    {extends file='parent:frontend/home/index.tpl'}
    {block name='frontend_home_index_banner'}
        {$smarty.block.parent}
        {block name="frontend_home_index_banner_klarna"}
                // Hier können Sie Ihren eignen gewünschten Banner ersetzen ..
            <script src="https://cdn.bannerflow.com/bf-placements/5a70b4697010901ca00890ab?targeturl=https%3A//www.klarna.com&politeloading=off&merchantid=501901433" async></script>
        {/block}
    {/block}
To add the Klarna banner in the footer, expand the frontend/index/footer.tpl template in your theme.
    {extends file='parent:frontend/index/footer.tpl'}
    {block name='frontend_index_footer_menu'}
        {block name="frontend_index_footer_menu_banner_klarna"}
                // Hier können Sie Ihren eignen gewünschten Banner ersetzen ..
            <script src="https://cdn.bannerflow.com/bf-placements/5a70b4697010901ca00890ab?targeturl=https%3A//www.klarna.com&politeloading=off&merchantid=501901433" async></script>
        {/block}
        {$smarty.block.parent}
    {/block}
To add the Klarna banner in the item detail page, expand the template frontend/detail/content/tab_container.tpl in your theme.
    {extends file='parent:frontend/detail/content/tab_container.tpl'}
    {block name="frontend_detail_index_outer_tabs"}
        {block name="frontend_detail_index_Klarna_banner"}
                // Hier können Sie Ihren eignen gewünschten Banner ersetzen ..
            <script src="https://cdn.bannerflow.com/bf-placements/5a70b080baae251e1ccc75e4?targeturl=https%3A//www.klarna.com&politeloading=off&merchantid=501901433" async></script>
        {/block}
        {$smarty.block.parent}
    {/block}
Other
Notes for AboCommerce
To use AboCommerce with Klarna Payments you need at least plugin version 2.0.0 of Klarna Payments. For configuration and usage of AboCommerce we recommend you to read the plugin documentation.
Please note that with a plugin version lower than 7.1.2 of AboCommerce the shipping tax rate for subscription orders is not saved and thus has to be calculated manually by the Klarna plugin. This may result in odd tax rates, which are displayed in the Klarna Merchant Center.
We recommend not to enable the payment method Klarna Installment Purchase for SubsoCommerce.
B2B sale
Selling to other companies is only possible with Klarna in certain countries. For this, see the answer to the question Can I sell to other companies with Klarna? from Klarna merchant support.